Kubernetes Course
 KUBERNETES
What are containers
Before we dive into Container Orchestration, let's review first what containers are.
Containers are an application-centric way to deliver high-performing, scalable applications on the infrastructure of your choice.
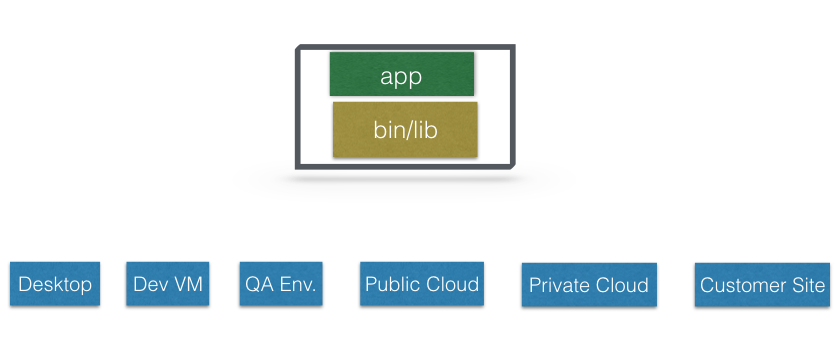
With a container image, we bundle the application along with its runtime and dependencies. We use that image to create an isolated executable environment, also known as container. We can deploy containers from a given image on the platform of our choice, such as desktops, VMs, Cloud, etc.
Container Orchestration ?
In Development and Quality Assurance (QA) environments, we can get away with running containers on a single host to develop and test applications. However, when we go to production, we do not have the same liberty, as we need to ensure that our applications:
- Are fault-tolerant
- Can scale, and do this on-demand
- Use resources optimally
- Can discover other applications automatically, and communicate with each other
- Are accessible from the external world
- Can update/rollback without any downtime.
Container Orchestrators are the tools which group hosts together to form a cluster, and help us fulfill the requirements mentioned above.
Container Orchestrators
Nowadays, there are many Container Orchestrators available, such as:
- Docker Swarm
Docker Swarm is a Container Orchestrator provided by Docker, Inc. It is part of Docker Engine. - Kubernetes
Kubernetes was started by Google, but now, it is a part of the Cloud Native Computing Foundation project. - Mesos Marathon
Marathon is one of the frameworks to run containers at scale on Apache Mesos. - Amazon ECS
Amazon EC2 Container Service (ECS) is a hosted service provided by AWS to run Docker containers at scale on its infrastructrue. - Hashicorp Nomad
Nomad is the Container Orchestrator provided by HashiCorp.
Why Use Container Orchestrators?
Though we can argue that containers at scale can be maintained manually, or with the help of some scripts, Container Orchestrators can make things easy for operators.
Container Orchestrators can:
- Bring multiple hosts together and make them part of a cluster
- Schedule containers to run on different hosts
- Help containers running on one host reach out to containers running on other hosts in the cluster
- Bind containers and storage
- Bind containers of similar type to a higher-level construct, like services, so we don't have to deal with individual containers
- Keep resource usage in-check, and optimize it when necessary
- Allow secure access to applications running inside containers.
With all these built-in benefits, it makes sense to use Container Orchestrators to manage containers. In this course, we will explore Kubernetes.
Where to Deploy Container Orchestrators?
Most Container Orchestrators can be deployed on the infrastructure of our choice. We can deploy them on bare-metal, VMs, on-premise, or on a cloud of our choice. For example, Kubernetes can be deployed on our laptop/workstation, inside a company's datacenter, on AWS, on OpenStack, etc. There are even one-click installers available to setup Kubernetes on the Cloud, like Google Container Engine on Google Cloud, or Azure Container Service on Microsoft Azure. Similar solutions are available for other Container Orchestrators, as well.
There are companies who offer managed Container Orchestration as a Service. We will explore them for Kubernetes in one of the later chapters.
Knowledge Check 1.1
What Is Kubernetes?
According to the Kubernetes website,
"Kubernetes is an open-source system for automating deployment, scaling, and management of containerized applications."
Kubernetes comes from the Greek word κυβερνήτης:, which means helmsman or ship pilot. With this analogy in mind, we can think of Kubernetes as the manager for shipping containers.
Kubernetes is also referred to as k8s, as there are 8 characters between k and s.
Kubernetes is highly inspired by the Google Borg system, which we will explore in this chapter. It is an open source project written in the Go language, and licensed under the Apache License Version 2.0.
Kubernetes was started by Google and, with its v1.0 release in July 2015, Google donated it to the Cloud Native Computing Foundation (CNCF). We will discuss more about CNCF a little later.
Generally, Kubernetes has new releases every three months. The current stable version is 1.7 (as of June 2017).
From Borg to Kubernetes
According to the abstract of Google's Borg paper, published in 2015,
"Google's Borg system is a cluster manager that runs hundreds of thousands of jobs, from many thousands of different applications, across a number of clusters each with up to tens of thousands of machines."
For more than a decade, Borg was Google's secret to run containerized workloads in production. Whatever services we use from Google, like Gmail, Drive, etc., they are all serviced using Borg.
Some of the initial authors of Kubernetes were Google employees who have used Borg and developed it in the past. They poured in their valuable knowledge and experience while designing Kubernetes. Some of the features/objects of Kubernetes that can be traced back to Borg, or to lessons learnt from it, are:
- API Servers
- Pods
- IP-per-Pod
- Services
- Labels.
We will explore all of them, and more, in this course.
Kubernetes Features I
Kubernetes offers a very rich set of features for container orchestration. Some of its fully supported features are:
- Automatic binpacking
Kubernetes automatically schedules the containers based on resource usage and constraints, without sacrificing the availability. - Self-healing
Kubernetes automatically replaces and reschedules the containers from failed nodes. It also kills and restarts the containers which do not respond to health checks, based on existing rules/policy. - Horizontal scaling
Kubernetes can automatically scale applications based on resource usage like CPU and memory. In some cases, it also supports dynamic scaling based on customer metrics. - Service discovery and Load balancing
Kubernetes groups sets of containers and refers to them via a DNS name. This DNS name is also called a Kubernetes service. Kubernetes can discover these services automatically, and load-balance requests between containers of a given service.
Kubernetes Features II
Some other fully supported Kubernetes features are:
- Automated rollouts and rollbacks
Kubernetes can roll out and roll back new versions/configurations of an application, without introducing any downtime. - Secrets and configuration management
Kubernetes can manage secrets and configuration details for an application without re-building the respective images. With secrets, we can share confidential information to our application without exposing it to the stack configuration, like on GitHub. - Storage orchestration
With Kubernetes and its plugins, we can automatically mount local, external, and storage solutions to the containers in a seamless manner, based on Software Defined Storage (SDS). - Batch executionBesides long running jobs, Kubernetes also supports batch execution.
There are many other features besides the ones we just mentioned, and they are currently in alpha/beta phase. They will add great value to any Kubernetes deployment once they become GA (generally available) features. For example, support for RBAC (Role-based access control) is currently in beta phase with the Kubernetes 1.6 release.
Why Use Kubernetes?
We just looked at some of the fully-supported Kubernetes features. We should also mention that Kubernetes is very portable and extensible. Kubernetes can be deployed on the environment of our choice, be it VMs, bare-metal, or public/private/hybrid/multi-cloud setups. Also, Kubernetes has a very modular and pluggable architecture. We can write custom APIs or plugins to extend its functionalities.
For a successful open source project, the community is as important as having great code. Kubernetes has a very thriving community across the world. It has more than 1350 contributors, who, over time, have done over 47,000 commits. There are meet-up groups in different cities which meet regularly to discuss about Kubernetes and its ecosystem. There are Special Interest Groups (SIGs), which focus on special interests, such as scaling, bare-metal, networking, etc. We will discuss more about them in our last chapter, Kubernetes Communities.
Kubernetes Users
With just a few years since its debut, many companies are running workloads using Kubernetes. We can find numerous user case studies on the Kubernetes website:
CNCF (Cloud Native Computing Foundation) and Kubernetes
For Kubernetes, the Cloud Native Computing Foundation:
- Provides a neutral home for the Kubernetes trademark and enforces proper usage
- Provides license scanning of core and vendored code
- Offers legal guidance on patent and copyright issues
- Creates open source curriculum, training, and certification
- Manages a software conformance working group
- Actively markets Kubernetes
- Hosts and funds developer marketing activities like K8Sport
- Supports ad hoc activities, like offering a neutral k8s AMI in the AWS Marketplace
- Funds conferences and meetup events.
we will explore the Kubernetes architecture, the different components of the Master and Worker nodes, the cluster state management with etcd and the network setup requirements. We will also talk about the network specification called Container Network Interface (CNI), which is used by Kubernetes.
Kubernetes Architecture
At a very high level, Kubernetes has the following main components:
- One or more Master Nodes
- One or more Worker Nodes
- Distributed key-value store, like etcd.
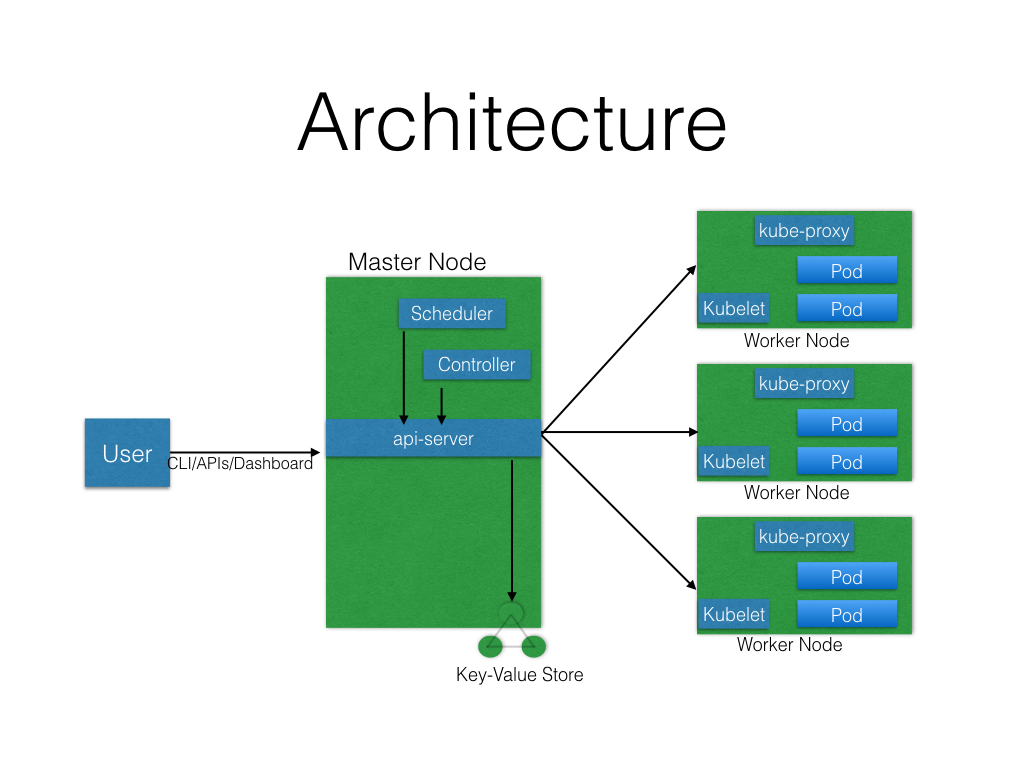
Next, we will explore the Kubernetes architecture in more detail.
Master Node
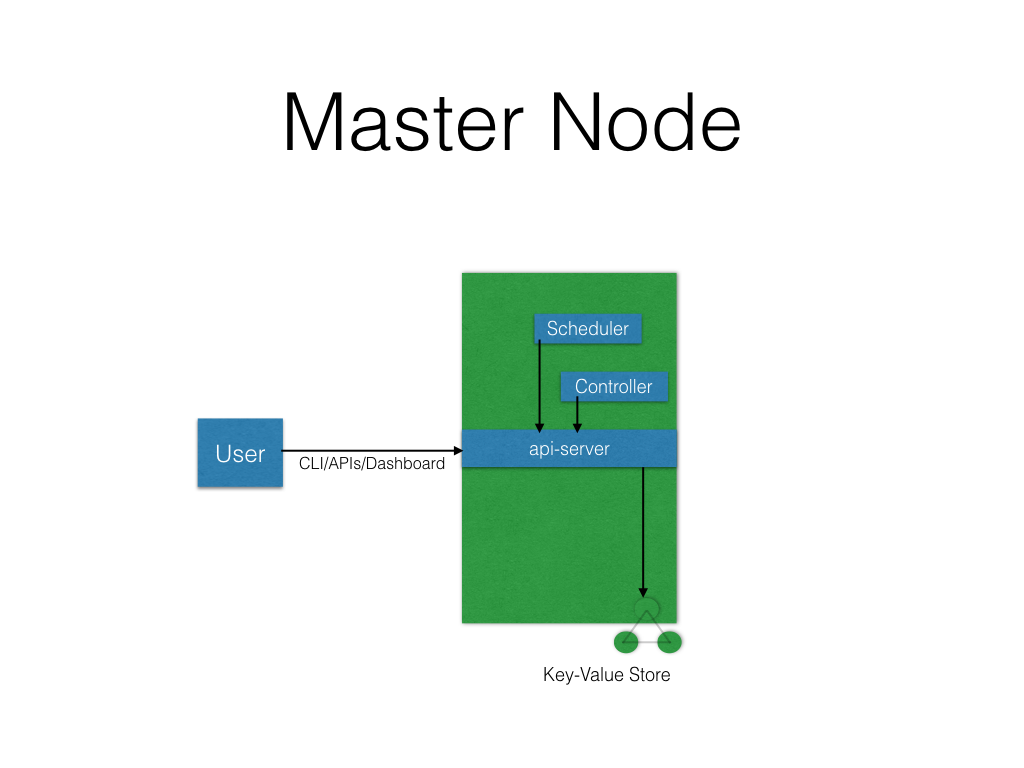
The Master Node is responsible for managing the Kubernetes cluster, and it is the entry point for all administrative tasks. We can communicate to the Master Node via the CLI, the GUI (Dashboard), or via APIs.
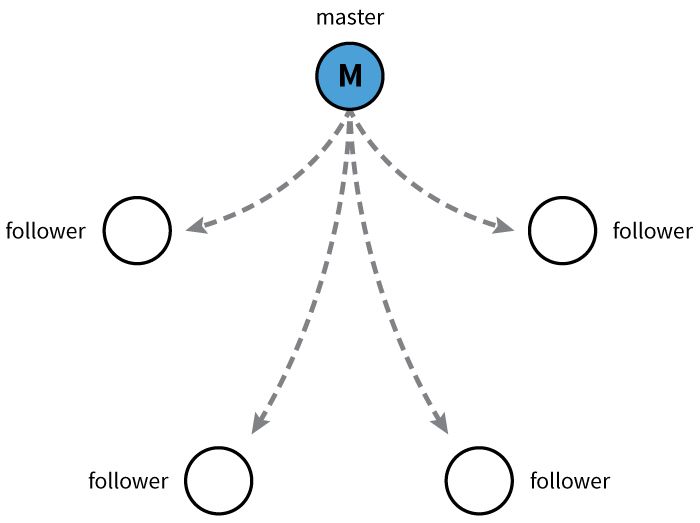
For fault tolerance purposes, there can be more than one Master Node in the cluster. If we have more than one Master Node, they would be in a HA (High Availability) mode, and only one of them will be the leader, performing all the operations. The rest of the Master Nodes would be followers.
To manage the cluster state, Kubernetes uses etcd, and all Master Nodes connect to it. etcd is a distributed key-value store, which we will discuss in a little bit. The key-value store can be part of the Master Node. It can also be configured externally, in which case, the Master Nodes would connect to it.
Master Node Components
A Master Node has the following components:
- API Server
All the administrative tasks are performed via the API Server within the Master Node. A user/operator sends REST commands to the API Server, which then validates and processes the requests. After executing the requests, the resulting state of the cluster is stored in the distributed key-value store. - Scheduler
As the name suggests, the Scheduler schedules the work to different Worker Nodes. The Scheduler has the resource usage information for each Worker Node. It also knows about the constraints that users/operators may have set, such as scheduling work on a node that has the label disk==ssd set. Before scheduling the work, the Scheduler also takes into account the quality of the service requirements, data locality, affinity, anti-affinity, etc. The Scheduler schedules the work in terms of Pods and Services. - Controller Manager
The Controller Manager manages different non-terminating control loops, which regulate the state of the Kubernetes cluster. Each one of these control loops knows about the desired state of the objects it manages, and watches their current state through the API Server. In a control loop, if the current state of the objects it manages does not meet the desired state, then the control loop takes corrective steps to make sure that the current state is the same as the desired state. - etcd
As discussed earlier, etcd is a distributed key-value store which is used to store the cluster state. It can be part of the Kubernetes Master, or, it can be configured externally, in which case, Master Nodes
Worker Node
A Worker Node is a machine (VM, physical server, etc.) which runs the applications using Pods and is controlled by the Master Node. Pods are scheduled on the Worker Nodes, which have the necessary tools to run and connect them. A Pod is the scheduling unit in Kubernetes. It is a logical collection of one or more containers which are always scheduled together. We will explore them further in later chapters.
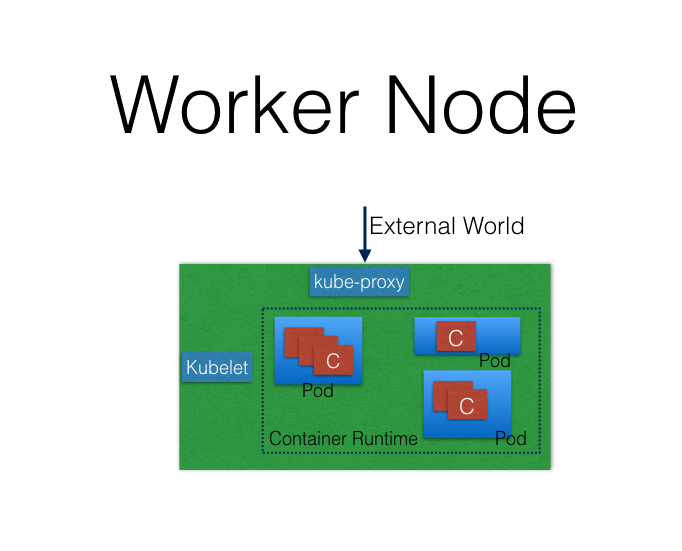
Also, to access the applications from the external world, we connect to Worker Nodes and not to the Master Node/s. We will dive deeper into this in future chapters.
Worker Node Components
A Worker Node has the following components:
- Container Runtime
To run containers, we need a Container Runtime on the Worker Node. By default, Kubernetes is configured to run containers with Docker. It can also run containers using the rkt Container Runtime. - kubelet
The kubelet is an agent which runs on each Worker Node and communicates with the Master Node. It receives the Pod definition via various means (primarily, through the API Server), and runs the containers associated with the Pod. It also makes sure the containers which are part of the Pods are healthy at all times.
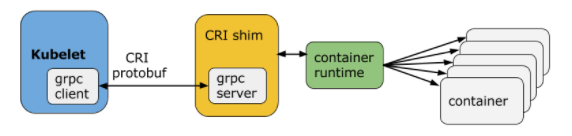
The kubelet connects with the Container Runtimes to run containers. Currently, the kubelet and Container Runtimes are tightly coupled. There is work in progress for the Container Runtime Interface (CRI) to have a pluggable CRI in the near future.
- kube-proxy
Instead of connecting directly to Pods to access the applications, we use a logical construct called a Service as a connection endpoint. A Service groups related Pods, which it load balances when accessed. We will talk more about Services in later chapters.
kube-proxy is the network proxy which runs on each Worker Node and listens to the API Server for each Service endpoint creation/deletion. For each Service endpoint, kube-proxy sets up the routes so that it can reach to it. We will explore this in more detail in later chapters.
State Management with etcd
As we mentioned earlier, Kubernetes uses etcd to store the cluster state. etcd is a distributed key-value store based on the Raft Consensus Algorithm. Raft allows a collection of machines to work as a coherent group that can survive the failures of some of its members. At any given time, one of the nodes in the group will be the Master, and the rest of them will be the Followers. Any node can be treated as a Master.
etcd is written in the Go programming language. In Kubernetes, besides storing the cluster state, etcd is also used to store configuration details such as subnets, ConfigMaps, Secrets, etc.
Network Setup Challenges
To have a fully functional Kubernetes cluster, we need to make sure of the following:
- A unique IP is assigned to each Pod
- Containers in a Pod can communicate to each other
- The Pod is able to communicate with other Pods in the cluster
- If configured, the application deployed inside a Pod is accessible from the external world.
All of the above are networking challenges which must be addressed before deploying the Kubernetes cluster. Next, we will see how we can solve these challenges.
Assigning a Unique IP Address to Each Pod
In Kubernetes, each Pod gets a unique IP address. For container networking, there are two primary specifications:
- Container Network Model (CNM), proposed by Docker
- Container Network Interface (CNI), proposed by CoreOS.
Kubernetes uses CNI to assign the IP address to each Pod.
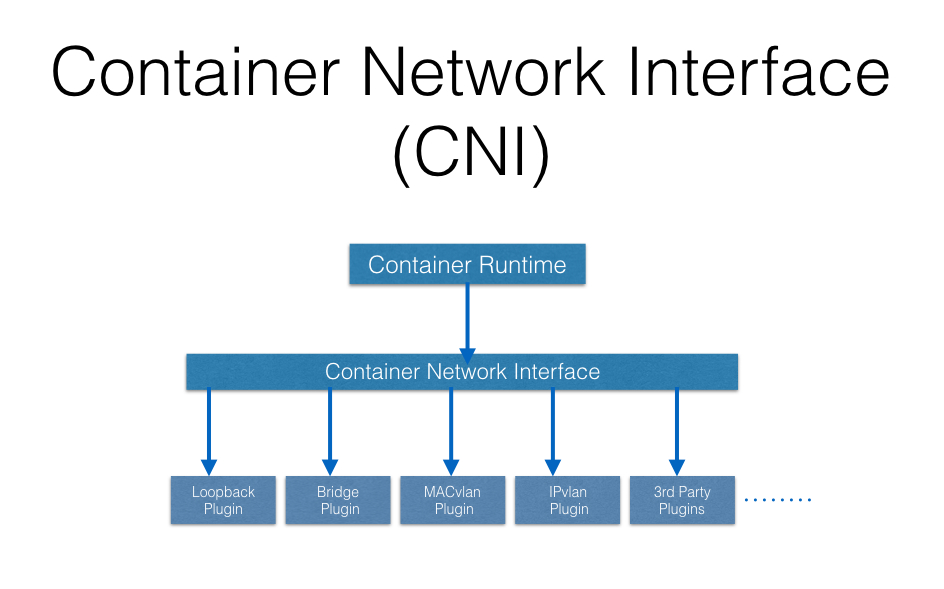
The Container Runtime offloads the IP assignment to CNI, which connects to the underlying configured plugin, like Bridge or MACvlan, to get the IP address. Once the IP address is given by the respective plugin, CNI forwards it back to the requested Container Runtime.
Container-to-Container Communication Inside a Pod
With the help of the underlying Host OS, all of the Container Runtimes generally create an isolated network entity for each container that it starts. On Linux, that entity is referred to as a Network Namespace. These Network Namespaces can be shared across containers, or with the Host Operating System.
Inside a Pod, containers share the Network Namespaces, so that they can reach to each other via localhost.
Pod-to-Pod Communication Across Nodes
In a clustered environment, the Pods can be scheduled on any node. We need to make sure that the Pods can communicate across the nodes, and all the nodes should be able to reach any Pod. Kubernetes also puts a condition that there shouldn't be any Network Address Translation (NAT) while doing the Pod-to-Pod communication across Hosts. We can achieve this via:
For more details, you can take a look at the available Kubernetes documentation.
Communication Between the External World and Pods
By exposing our services to the external world with kube-proxy, we can access our applications from outside the cluster. We will have a complete chapter dedicated to this, so we will dive into this later.
Kubernetes Configuration
Kubernetes can be installed using different configurations. The four major installation types are briefly presented below:
- All-in-One Single-Node Installation
With All-in-One, all the Master and Worker components are installed on a single node. This is very useful for learning, development, and testing. This type should not be used in production. Minikube is one such example, and we are going to explore it in future chapters. - Single-Node etcd, Single-Master, and Multi-Worker Installation
In this setup, we will have a single Master Node, which will also run a single-node etcd instance. Multiple Worker Nodes are connected to the Master Node. - Single-Node etcd, Multi-Master, and Multi-Worker Installation
In this setup, we will have multiple Master Nodes, which will work in HA mode, but we will have a single-node etcd instance. Multiple Worker Nodes are connected to the Master Nodes. - Multi-Node etcd, Multi-Master, and Multi-Worker Installation
In this mode, etcd is configured in a clustered mode, outside the Kubernetes cluster, and the Nodes connect to it. The Master Nodes are all configured in an HA mode, connecting to multiple Worker Nodes. This is the most advanced and recommended production setup.
Infrastructure for Kubernetes Installation
Once we decide on the installation type, we also need to make some infrastructure-related decisions, such as:
- Should we set up Kubernetes on bare-metal, public cloud, or private cloud?
- Which underlying system should we use? Should we choose RHEL, CoreOS, CentOS, or something else?
- Which networking solution should we use?
- And so on.
The Kubernetes documentation has details in regards to choosing the right solution. Next, we will take a closer look at these solutions.
Localhost Installation
There are a few localhost installation options available to deploy single- or multi-node Kubernetes clusters on our workstation/laptop:
Minikube is the preferred and recommended way to create an all-in-one Kubernetes setup. We will be using it extensively in this course.
On-Premise Installation
Kubernetes can be installed on-premise on VMs and Bare Metal.
On-Premise VMs
Kubernetes can be installed on VMs created via Vagrant, VMware vSphere, KVM, etc. There are different tools available to automate the installation, like Ansible or kubeadm.
Kubernetes can be installed on VMs created via Vagrant, VMware vSphere, KVM, etc. There are different tools available to automate the installation, like Ansible or kubeadm.
On-Premise Bare Metal
Kubernetes can be installed on on-premise Bare Metal, on top of different Operating Systems, like RHEL, CoreOS, CentOS, Fedora, Ubuntu, etc. Most of the tools used to install VMs can be used with Bare Metal as well.
Kubernetes can be installed on on-premise Bare Metal, on top of different Operating Systems, like RHEL, CoreOS, CentOS, Fedora, Ubuntu, etc. Most of the tools used to install VMs can be used with Bare Metal as well.
Cloud Installation
Kubernetes can be installed and managed on almost any Cloud environment.
Hosted SolutionsWith Hosted Solutions, any given software is completely managed by the provider. The user will just need to pay hosting and management charges. Some examples of vendors providing Hosted Solutions for Kubernetes are listed below:
Turnkey Cloud SolutionsWith Turnkey Cloud Solutions, we can deploy a solution or software with just a few commands. For Kubernetes, we have some Turnkey Cloud Solutions, with which Kubernetes can be installed with just a few commands on an underlying IaaS platform, such as:
Bare Metal
Kubernetes can be installed on Bare Metal provided by different cloud providers.
Kubernetes Installation Tools/Resources
While discussing installation configuration and the underlying infrastructure, let's take a look at some useful tools/resources available:
- kubeadm
kubeadm is a first-class citizen on the Kubernetes ecosystem. It is a secure and recommended way to bootstrap the Kubernetes cluster. It has a set of building blocks to setup the cluster, but it is easily extendable to add more functionality. Please note that kubeadm does not support the provisioning of machines. - Kubespray
With Kubespray (formerly known as Kargo), we can install Highly Available Kubernetes clusters on AWS, GCE, Azure, OpenStack, or Bare Metal. Kubespray is based on Ansible, and is available on most Linux distributions. It is a Kubernetes Incubator project. - Kops
With Kops, we can create, destroy, upgrade, and maintain production-grade, highly-available Kubernetes clusters from the command line. It can provision the machines as well. Currently, AWS is officially supported. Support for GCE and VMware vSphere are in alpha stage, and other platforms are planned for the future.
If the existing solutions and tools do not fit your requirements, then you can always install Kubernetes from scratch.
It is worth checking out the Kubernetes The Hard Way GitHub project by Kelsey Hightower, which shares the manual steps involved in bootstrapping a Kubernetes cluster.
Requirements for Running Minikube
Minikube runs as a VM. Therefore, we need to make sure that we have the supported hardware and the hypervisor to create VMs. Next, we outline the requirements to run Minikube on our workstation/laptop:
- kubectl
kubectl is a binary to access any Kubernetes cluster. Generally, it is installed before starting minikube, but we can install it later, as well. If kubectl is not found while installing minikube, we will get a warning message, which can be safely ignored (just remember that we will have to install kubectl later). We will explore kubectl in future chapters. - On macOS
xhyve driver, VirtualBox or VMware Fusion hypervisors - On Linux
VirtualBox or KVM hypervisors - On Windows
VirtualBox or Hyper-V hypervisors - VT-x/AMD-v virtualization must be enabled in BIOS
- Internet connection on first run.
In the chapter, we will use VirtualBox as hypervisor on all three operating systems - Linux, macOS, and Windows, to create the Minikube VM.
Installing Minikube on Linux
Next, we will learn how to install minikube on Linux (Ubuntu 16.04):
- Install the hypervisor (VirtualBox), if you haven't done so already
$ sudo apt-get install virtualbox - Install minikube
We can download the latest release from the minikube release page. Once downloaded, we need to make it executable and copy it in the PATH:
$ curl -Lo minikube https://storage.googleapis.com/minikube/releases/v0.20.0/minikube-linux-amd64 && chmod +x minikube && sudo mv minikube /usr/local/bin/ - Start minikube
We can start minikube with the minikube start command:
$ minikube start
Starting local Kubernetes v1.6.4 cluster...
Starting VM...Moving files into cluster...
Setting up certs...
Starting cluster components...
Connecting to cluster...
Setting up kubeconfig...
Kubectl is now configured to use the cluster. - Check the status
With the minikube status command, we can see the status of minikube:
$ minikube statusminikube: Running
localkube: Running
kubectl: Correctly Configured: pointing to minikube-vm at 192.168.99.100 - Stop minikube
With the minikube stop command, we can stop minikube:
$ minikube stop
Stopping local Kubernetes cluster...
Machine stopped.
Installing Minikube on macOS
On macOS, Minikube uses VirtualBox as the default hypervisor, which we will use as well. But, if you would like to use the xhyve hypervisor to start Minikube VM, then, while starting, you will need to pass the --vm-driver=xhyve
Next, we will learn how to install minikube on macOS
- Install VirtualBox on macOS.
- Install minikube
We can download the latest release from the minikube release page. Once downloaded, we need to make it executable and copy it in the PATH.
$ curl -Lo minikube https://storage.googleapis.com/minikube/releases/v0.20.0/minikube-darwin-amd64 && chmod +x minikube && sudo mv minikube /usr/local/bin/ - Start minikube
We can start minikube with the minikube start command:
$ minikube startStarting local Kubernetes v1.6.4 cluster...Starting VM...Downloading Minikube ISO90.95 MB / 90.95 MB [==============================================] 100.00% 0sMoving files into cluster...Setting up certs...Starting cluster components...Connecting to cluster...Setting up kubeconfig...Kubectl is now configured to use the cluster. - Check the status
We can see the status of minikube with the minikube status command:
$ minikube statusminikube: Running
localkube: Running
kubectl: Correctly Configured: pointing to minikube-vm at 192.168.99.10
- Stop minikube
We can stop minikube with the minikube stop command:
$ minikube stop
Stopping local Kubernetes cluster...
Machine stopped.
Installing Minikube on Windows
We will be using VirtualBox as the hypervisor to create the minikube VM. Make sure Hyper-V is disabled while running VirtualBox.
Please note that Windows support is currently in the experimental phase, and you might encounter issues during installation.
Following are the instructions to install minikube on Windows 10:
- Install VirtualBox
- Go to the minikube release page
- Download the minikube binary from the Distribution section
- Add the downloaded minikube binary to your PATH
- Download kubectl and add it to your PATH
- Start minikube
$ minikube start --vm-driver=virtualbox
Starting local Kubernetes v1.6.4 cluster
Starting VM...
Downloading Minikube ISO
90.95 MB / 90.95 MB [==============================================] 100.00% 0s
Moving files into cluster...
Setting up certs...
Starting cluster components...
Connecting to cluster...
Setting up kubeconfig...
Kubectl is now configured to use the cluster.
With the --vm-driver=virtualbox option, we are suggesting minikube to choose VirtualBox as a hypervisor to create the virtual machine.
- Check the statusWe can see the status of minikube with the minikube status command:
$ minikube status
minikube: Running
localkube: Running
kubectl: Correctly Configured: pointing to minikube-vm at 192.168.99.100
- Stop minikube
$ minikube stop
Stopping local Kubernetes cluster...
Machine stopped.

Great Blog!!! thanks for sharing with us.
ReplyDeletecareer in software testing
software testing career
The history from Borg to Kubernetes really puts its design decisions into perspective. I’ve been curious about how community contributions shape the roadmap—especially with observability tools being added so quickly. Will you be exploring monitoring strategies for Kubernetes clusters later in this course?
ReplyDeleteThis explanation of container orchestration makes it very clear why Kubernetes became the standard. I remember struggling with Docker Swarm in the past, and Kubernetes felt like a big step up once I learned the basics. Will this Kubernetes course also cover real-world deployment pitfalls, like networking or storage misconfigurations?
ReplyDelete
ReplyDeleteReally helpful explanation of kubernetes concepts! The examples and step-by-step guidance made it very easy to understand. This is a great resource for anyone wanting to build a good knowledge of kubernetes-tutorial. Keep sharing such informative content!.